Tag: Guide

  • Body Doubling Apps and Tools for Focus and Productivity

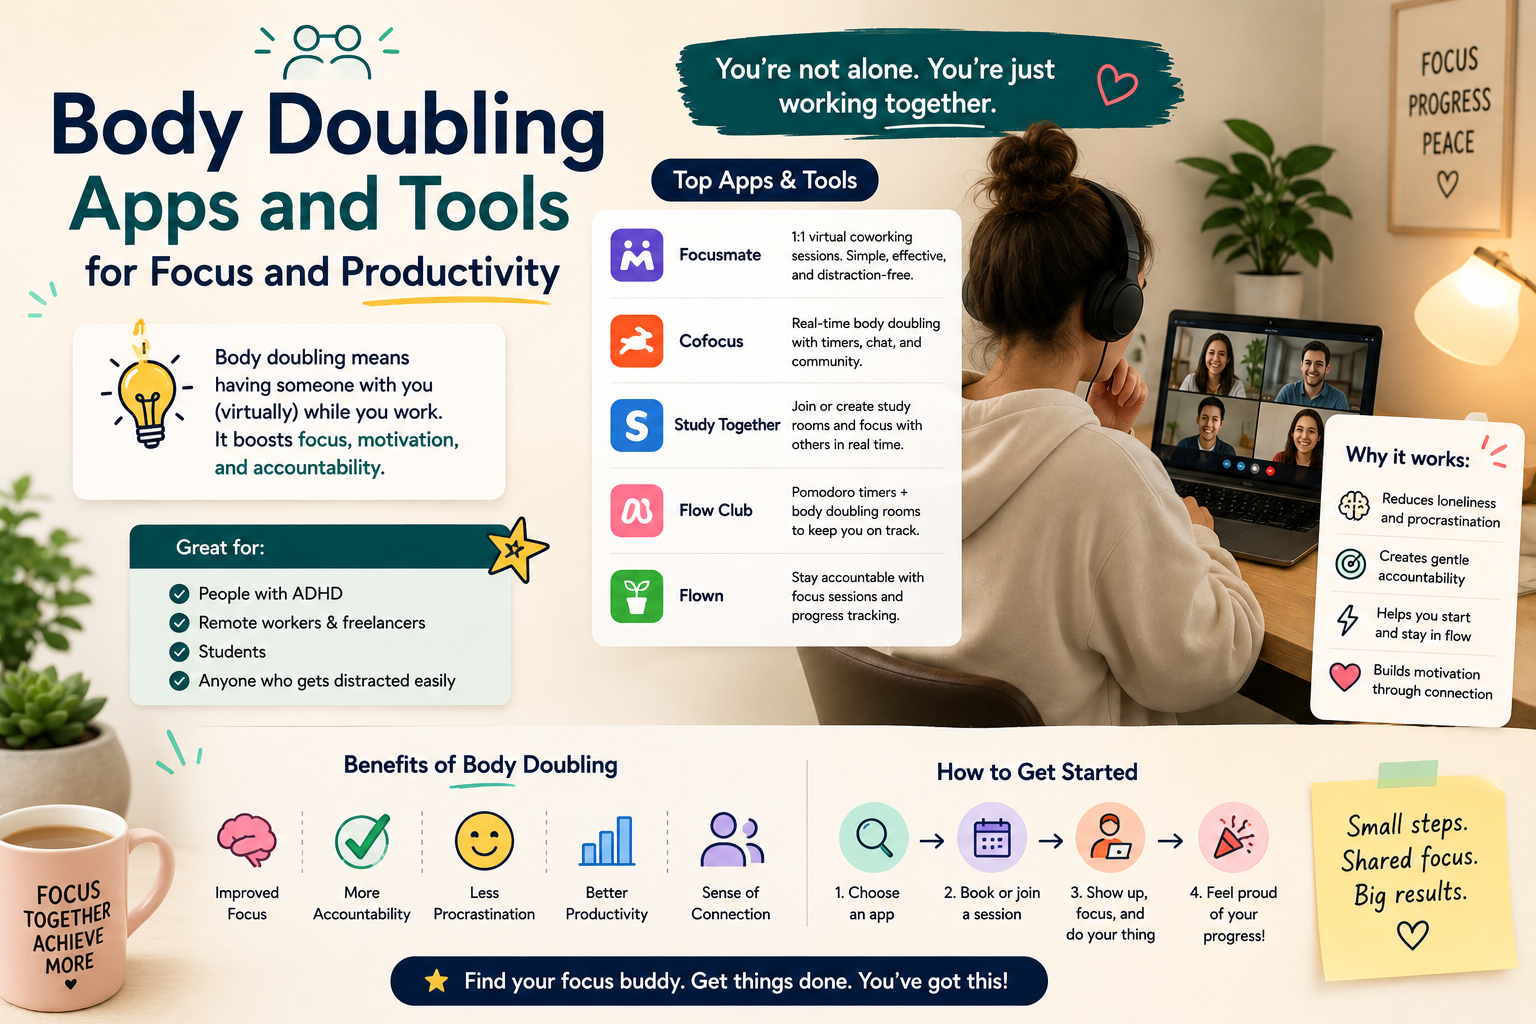
    Body Doubling Apps and Tools for Focus and Productivity

    Traditional productivity tactics—like setting timers or building color-coded planners—frequently fall short when motivation drops.

    Enter body doubling: a simple psychological strategy where working alongside another person, even silently, creates an anchor of focus and accountability.

    While body doubling historically relied on grabbing a seat next to a friend at a library or coffee shop, a modern ecosystem of digital apps and virtual communities has transformed this strategy into an accessible, on-demand productivity tool.

    What is Body Doubling and Why Does It Work?

    Body doubling is the practice of completing tasks in the presence of someone else. The “double” doesn’t need to help with your work or even be doing the same task; their presence simply serves as a passive mirror for focus.

    From a cognitive perspective, body doubling taps into several key psychological mechanisms:

    • Social Facilitation: Humans naturally adjust their performance and focus when observed by others. Knowing someone else is quietly working nearby signals to the brain that it is time to stay on task.
    • External Executive Function: For those with ADHD, initiating a task requires overcoming high internal resistance. Having a body double acts as an external anchor, reducing the friction required to sit down and begin.
    • Reduced Ruminative Isolation: Working alone can trigger anxiety, perfectionism, or distraction. The presence of another person ground your environment, interrupting internal loops of procrastination.

    The Spectrum of Virtual Body Doubling Tools

    Digital platforms have adapted body doubling into three main models, ranging from structured 1-on-1 video sessions to ambient, asynchronous group streams.

    1. Structured 1-on-1 Video Matchmaking

    These platforms pair you with a single partner anywhere in the world for a timed session over video.

    • Focusmate: The gold standard of virtual body doubling. Users book 25-, 50-, or 75-minute sessions. At the start of the call, you and your partner briefly state your goals in 30 seconds, mute your microphones, keep your cameras on, and work silently. At the end, you unmute to check in on progress.
    • Best For: High-accountability tasks, deep work, and structured work blocks.

    2. Co-Working Communities & Group Rooms

    If 1-on-1 video calls feel too intense or intimate, group-based co-working platforms offer a lower-pressure environment.

    • FLOWN: Offers live, moderated group sessions led by a host. Sessions combine body doubling with breathwork, micro-stretches, and structured goal-setting.
    • Flow Club: High-energy, community-driven virtual sessions where participants share their task lists in a group chat and work alongside an active host.
    • Best For: Those who want structured group energy, community interaction, and guided work sprints.

    3. Asynchronous & Ambient Platforms

    For individuals who prefer complete anonymity or cannot commit to scheduled calls, passive options provide the feeling of company without active interaction.

    • StudyStream / Discord Co-Working Servers: Public video rooms where hundreds of students and professionals study together silently on camera.
    • YouTube “Study/Work With Me” Streams: Pre-recorded or live streams featuring creators working in real time using Pomodoro timers, often paired with ambient lo-fi music.
    • Best For: Late-night sessions, flexible schedules, and introverted workers who want background company without verbal check-ins.

    Comparing Popular Body Doubling Tools

    ToolFormatVideo Required?Ideal Use Case
    Focusmate1-on-1 scheduled sessionsYesHigh-accountability task completion
    FLOWNFacilitated group roomsOptionalGuided focus with light social connection
    Flow ClubSmall group video sprintsYesCommunity-focused sprint sessions
    StudyStreamLarge public video channelsOptionalPassive, low-pressure group background
    YouTube StreamsAsynchronous / Live videoNoLow-friction background company

    How to Get the Most Out of Body Doubling

    To turn a body doubling session into a reliable habit, follow these foundational strategies:

    1. Define Hyper-Specific Tasks: Before entering a session, write down exact, actionable steps (e.g., “Draft 3 paragraphs of the intro” instead of “Work on article”). Ambiguity leads to lost focus, even with a body double present.
    2. Use Video When Possible: Keeping your camera on provides visual accountability, preventing you from wandering away or picking up your phone unnoticed.
    3. Start Small: If task initiation is your main hurdle, book a short 25-minute session dedicated entirely to opening the document and clearing the first micro-step.

    Conclusion: Leveraging Shared Energy for Focus

    Body doubling reframes productivity from a solitary struggle into a shared human experience. By pairing digital tools with clear intention, you can bypass task paralysis and build a reliable environment for sustained focus.

    Whether you need the firm accountability of a 1-on-1 video call or the subtle presence of a live stream, virtual body doubling offers a flexible, non-judgmental path to getting things done.
  • Why Traditional To-Do Lists Don’t Work for ADHD Brains

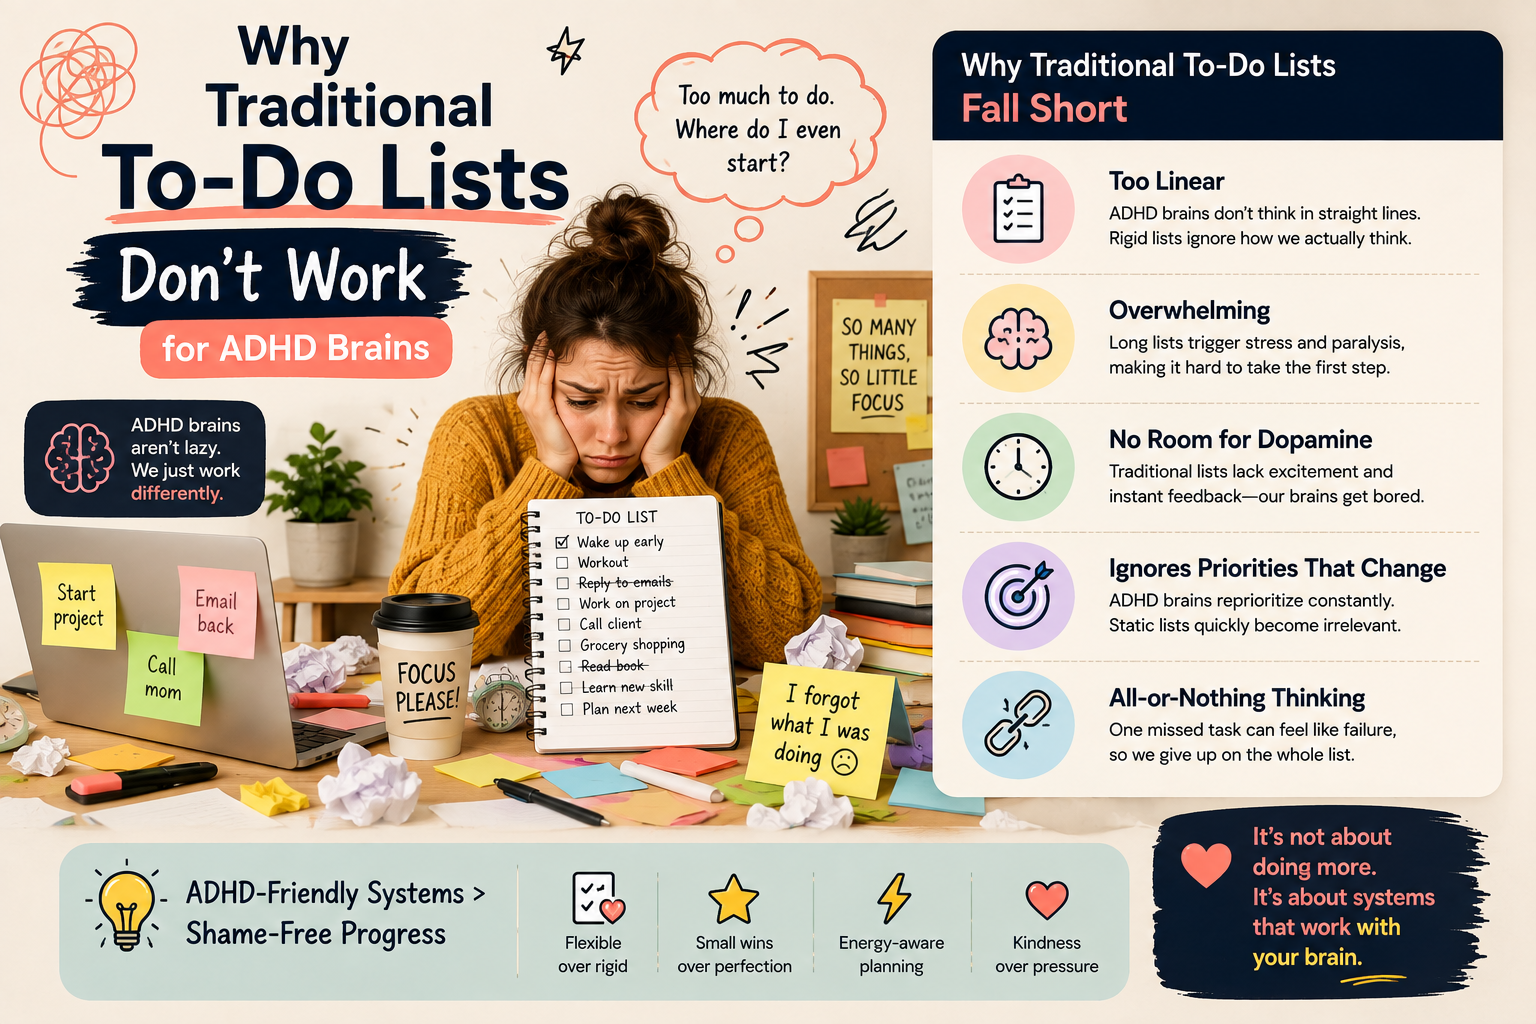
    Why Traditional To-Do Lists Don’t Work for ADHD Brains

    For millions of neurodivergent individuals, opening a traditional, linear to-do list brings a familiar wave of paralysis rather than productivity. You write down task after task, intending to check them off one by one, only for the paper to turn into a visual tally of personal failure by the end of the day.

    If standard productivity advice like “just write a list and stick to it” leaves you feeling stuck, it isn’t a lack of willpower. Standard task-management systems were built around neurotypical executive functioning. For an ADHD brain, traditional to-do lists are practically designed to trigger cognitive overload.

    The Architecture of the ADHD Executive Function Gap

    To understand why standard lists fail, it helps to look at how an ADHD brain processes working memory, time, and motivation.

    ADHD (Attention Deficit Hyperactivity Disorder) is fundamentally a dynamic of executive dysfunction—specifically involving the regulation of dopamine, working memory, and internal prioritization. Where a neurotypical brain sees a list of three simple tasks, an ADHD brain experiences structural friction across four distinct areas:

    ┌────────────────────────────────────────────────────────┐
    │               ADHD TASK PARALYSIS                      │
    ├───────────────────┬───────────────────┬────────────────┤
    │   NOW vs. NOT NOW │ OVERWHELM TRAP    │ DOPAMINE GAP   │
    │ Time Blindness    │ Micro-step Blind  │ Flat Reward    │
    └───────────────────┴───────────────────┴────────────────┘
    

    1. Time Blindness (“Now” vs. “Not Now”)

    Neurotypical brains naturally categorize time into granular blocks: past, present, next hour, tomorrow, next week. ADHD brains primarily operate in two temporal states: Now and Not Now.

    A static, linear to-do list places items due in two hours right next to items due in three weeks. Because the ADHD brain struggles to intuitively map urgency over time, every single item on that paper registers with equal, immediate pressure. The result is instant cognitive fatigue.

    2. Micro-Step Blindness & Initiation Friction

    A single line item like “Clean the kitchen” seems simple to a neurotypical brain. However, an ADHD brain instantly breaks that single line into dozens of micro-decisions:

    • Where do I put this mug?
    • Do I have clean sponges?
    • Should I unload the dishwasher top rack or bottom rack first?

    Because the list item omits these micro-steps, the initiation cost skyrockets. The brain perceives the single bullet point as a massive, ambiguous mountain, leading to physical task paralysis.

    3. The Flat Dopamine Landscape

    Dopamine is the neurotransmitter responsible for motivation, task-initiation, and reward registration. Neurotypical brains get a steady trickle of dopamine simply from completing a routine task or crossing off a item.

    An ADHD brain has a baseline dopamine deficit. Checking off “Pay electric bill” offers virtually no internal reward. Without an immediate threat (an impending deadline) or novelty/interest, the brain cannot mobilize the dopamine required to initiate the task.

    Why Popular Productivity Hacks Backfire

    Many standard productivity frameworks actually compound the problem for neurodivergent thinkers:

    Traditional MethodWhy It Fails ADHD Brains
    Eisenhower Matrix (Urgent vs. Important)Requires constant higher-level meta-decisions. When everything feels like “Now,” prioritizing items into 4 distinct quadrants causes decision fatigue before work even starts.
    Bullet Journaling (Strict layouts)The setup maintenance requires sustained, low-dopamine executive function. When a day is missed, guilt sets in, leading to total abandonment of the system.
    Massive Master ListsActs as a constant visual threat environment. The longer the list grows, the more it signals failure, triggering an emotional avoidance response.

    ADHD-Friendly Alternatives That Actually Work

    Instead of forcing your brain to adapt to a system built for someone else, adapt the system to work with your neurobiology.

    1. The “Top 3” Variable Buffer (Constraint-Based)

    Never look at a master list during the working day. Keep a master dump file hidden away, and pull out a maximum of three non-negotiable items onto a sticky note for the day. Once those three are complete, anything else is bonus points. Reducing visual options lowers choice-paralysis.

    2. Externalize Micro-Steps (Verb-First Lists)

    Replace vague noun phrases with clear, immediate physical verbs that eliminate decision fatigue:

    • Tax Return
    • 🟢 Open laptop and log into bank account

    3. Gamification and Visual Energy Trackers

    Instead of organizing tasks by time, organize them by energy requirements:

    • High-Dopamine / Deep Focus: Complex problem solving.
    • Low-Brainpower / Low-Dopamine: Folding laundry while watching a YouTube video, clearing spam emails.

    Match your task selection to your current physiological energy level rather than an arbitrary schedule.

    Conclusion: Embrace Accommodations Without Guilt

    Abandoning traditional to-do lists is not a sign of failure; it is an act of self-accommodation. Productivity is not about adhering to rigid paper formats—it is about creating an environment where your brain can comfortably initiate and finish work.

    Stop fighting your neurology with systems that drain your battery. By shrinking your visual field, reducing initiation steps, and leaning into interest-based motivation, you can build a workflow that honors how your brain actually operates.

  • Self-Hosting Your Own Cloud Storage: A Beginner’s Home Lab Project

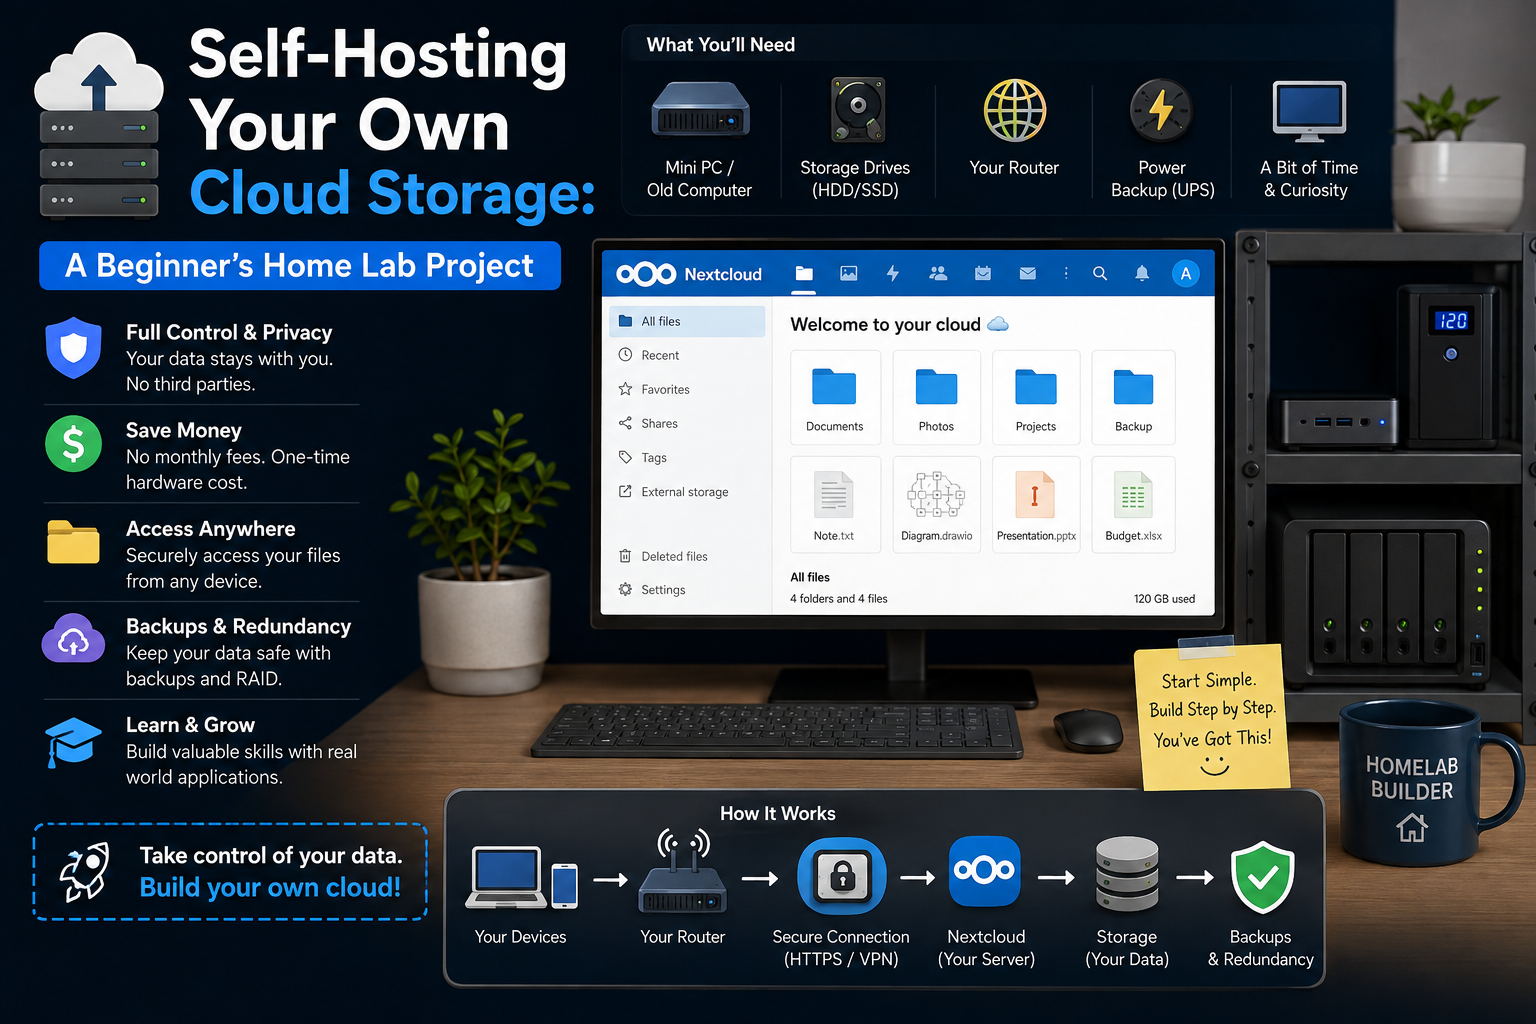
    Self-Hosting Your Own Cloud Storage: A Beginner’s Home Lab Project

    Taking control of your digital life often starts with one key shift: moving your files away from third-party tech giants and onto hardware you physically own.

    Whether you are tired of monthly subscription fees, concerned about data privacy, or eager to dive into the rewarding world of home labbing, self-hosting your own cloud storage is the ultimate beginner-friendly entry project.

    This deep-dive guide walks you step-by-step through setting up your own private cloud storage solution using Nextcloud running inside Docker, giving you Google Drive-like functionality accessible from anywhere—completely under your control.

    Why Self-Host Your Cloud Storage?

    Before touching a terminal, it helps to understand the core trade-offs of self-hosting versus public cloud services:

    • Complete Data Sovereignty: Your personal photos, sensitive documents, and backups stay on your local storage drives—not on server farms owned by corporations.
    • Zero Subscription Costs: Pay once for your hardware and drives. No sudden tier changes or monthly fees.
    • Unlimited Customization: Expand your storage by swapping drives, adding custom streaming apps, or integrating automated back-ups.
    • Privacy First: End-to-end encryption and custom access controls mean only you choose who sees your files.

    Prerequisites & Recommended Hardware

    You don’t need a multi-thousand-dollar server rack to start home labbing. An old laptop, a recycled desktop, or a inexpensive mini PC (like an Intel N100 box or Raspberry Pi 4/5) works perfectly.

    Recommended Starter Specs:

    • CPU: Any modern 64-bit x86 or ARM64 processor (2+ cores)
    • RAM: 4 GB minimum (8 GB recommended for smooth preview generation)
    • Storage: 1x SSD for your Operating System + 1x External/Internal HDD or SSD for raw file storage
    • OS: Ubuntu Server 24.04 LTS or Debian 12 (headless/CLI mode)

    Step 1: Install Docker and Docker Compose

    Docker simplifies self-hosting by running services inside isolated “containers.” This means you won’t pollute your host operating system with complex dependencies.

    1. SSH into your home lab machine (or open its terminal).
    2. Update your package manager and install Docker with Compose support:

    Bash

    sudo apt update && sudo apt upgrade -y
    sudo apt install docker.io docker-compose-v2 -y
    sudo systemctl enable --now docker
    
    1. Verify Docker is running properly:

    Bash

    sudo docker --version
    

    Step 2: Create Your Nextcloud Stack File

    Nextcloud is the industry-standard open-source platform for self-hosted cloud storage. It handles file sync, mobile camera auto-uploads, user management, and calendar/contacts syncing.

    To run Nextcloud reliably, we will set up a container stack consisting of Nextcloud (the app) paired with a MariaDB database (for metadata and performance).

    1. Create a directory to organize your home lab services:

    Bash

    mkdir -p ~/homelab/nextcloud && cd ~/homelab/nextcloud
    
    1. Create a file named docker-compose.yml:

    Bash

    nano docker-compose.yml
    
    1. Paste the following configuration into the file:

    YAML

    version: '3.8'
    
    services:
      db:
        image: mariadb:10.11
        container_name: nextcloud-db
        restart: always
        command: --transaction-isolation=READ-COMMITTED --log-bin-trust-function-creators=1
        volumes:
          - db_data:/var/lib/mysql
        environment:
          - MYSQL_ROOT_PASSWORD=ChangeThisStrongRootPassword!
          - MYSQL_PASSWORD=ChangeThisStrongUserPassword!
          - MYSQL_DATABASE=nextcloud
          - MYSQL_USER=nextcloud
    
      app:
        image: nextcloud:latest
        container_name: nextcloud-app
        restart: always
        ports:
          - 8080:80
        links:
          - db
        volumes:
          - nextcloud_data:/var/www/html
        environment:
          - MYSQL_PASSWORD=ChangeThisStrongUserPassword!
          - MYSQL_DATABASE=nextcloud
          - MYSQL_USER=nextcloud
          - MYSQL_HOST=db
    
    volumes:
      db_data:
      nextcloud_data:
    

    Security Note: Make sure to replace ChangeThisStrongRootPassword! and ChangeThisStrongUserPassword! with your own secure passwords before saving (Ctrl + O, Enter, Ctrl + X).

    Step 3: Launch Your Private Cloud

    With your configuration saved, deploying the entire stack requires just a single command.

    1. Start the Docker containers in detached (background) mode:

    Bash

    sudo docker compose up -d
    
    1. Docker will download the required images and launch the services. Once the terminal prompt returns, verify both containers are active:

    Bash

    sudo docker ps
    

    Step 4: Complete Initial Web Setup

    1. Open a web browser on your personal computer or phone connected to the same home Wi-Fi/local network.
    2. Navigate to your server’s local IP address using port 8080: http://<YOUR-SERVER-LOCAL-IP>:8080 (e.g., http://192.168.1.150:8080)
    3. You will be greeted by the initial Nextcloud setup screen.
    4. Create your main Admin Account username and Password.
    5. Leave the database fields default (Docker Compose configured them automatically behind the scenes).
    6. Click Install / Finish Setup.

    Within a minute or two, your dashboard will load, presenting you with a full-featured web drive interface!

    Step 5: Connect Mobile & Desktop Apps

    To make your self-hosted setup function just like commercial services:

    • Desktop: Download the official Nextcloud Desktop Client for Windows, macOS, or Linux. Select “Log in”, enter your server URL (http://<YOUR-SERVER-LOCAL-IP>:8080), and select a local folder on your computer to auto-sync.
    • Mobile: Download the Nextcloud App from iOS App Store or Google Play Store. Log in and enable Auto-Upload for photos to automatically back up your mobile camera roll to your local home lab storage whenever you connect to your home Wi-Fi.

    Conclusion: Essential Next Steps for Home Labbers

    Setting up Nextcloud in Docker gives you a rock-solid local storage foundation, but your home lab journey is just beginning. As you become comfortable managing your setup, consider these essential upgrades:

    • Configure Secure Remote Access: To access your files outside your home Wi-Fi without exposing your server to public internet attacks, set up a zero-trust overlay network like Tailscale or WireGuard VPN.
    • Automate External Backups: Remember the cardinal rule of homelabbing: Self-hosting is not a backup! Implement the 3-2-1 backup rule by periodically syncing your Docker data volumes to an encrypted external drive or offsite cloud bucket (like Backblaze B2 using Rclone).
    • Add Reverse Proxy & SSL: Implement Nginx Proxy Manager or Caddy to route incoming traffic safely with free HTTPS SSL certificates via Let’s Encrypt.

    Taking charge of your own infrastructure requires a learning curve, but the peace of mind knowing your data is completely yours makes every step worth it.